


A work light specification should describe the product a factory must build, not the impression a sales sample creates. “Bright,” “rugged” and “long runtime” may help a presentation, but they do not tell purchasing which LED is approved, quality control how to judge a hinge, or production whether a replacement battery is acceptable. When those decisions remain in chats and photographs, two people can approve two different products under the same model name.
This guide gives importers, tool brands, automotive suppliers and private-label teams a practical framework for writing an OEM work light specification. It focuses on the fields that belong in a controlled document: application, optics, power, controls, mechanics, environment, branding, packaging and acceptance. Brightenlux public product and application pages provide useful reference points, but every value must be confirmed for the exact model, sample and destination market.

Quick answer: what belongs in an OEM work light specification?
A useful specification identifies the approved product and revision, explains the work task, lists measurable requirements, names critical components or acceptable boundaries, describes operating behaviour, defines the package contents and states how production will be accepted. It should distinguish confirmed values from targets and open questions. It should also link each important claim to a test method, document or approved sample.
For an OEM LED work light, the document normally covers nine blocks: project identity, use case, optical performance, battery and charging, controls, mechanical construction, environmental expectations, OEM presentation and production acceptance. A tenth block can record revisions, approvals and unresolved decisions. The result does not need to be a hundred-page engineering manual. It needs to remove ambiguity where ambiguity would change cost, performance or customer experience.
Begin with a two-page working specification and expand only where the design warrants it. A folding inspection lamp may need detailed hinge, magnet and hook criteria. A portable floodlight may need stability, beam-uniformity and thermal limits. A right-angle light may need clip retention and head-position checks. Different architectures require different evidence.
Specification status: stop targets from becoming accidental promises
One of the simplest improvements is to give every value a status. Buyers often write “1000 lumens, 8 hours, IP65” in an RFQ, while the factory reads those numbers as preferences and marketing later reads them as approved facts. A status column prevents that drift.
| Status | Meaning | Example | Next action |
|---|---|---|---|
| Required | A non-negotiable condition for the project | Magnetic mounting on a vertical steel panel | Supplier confirms feasibility and acceptance method |
| Target | Desired performance awaiting proposal or test | Four hours of useful medium-mode output | Evaluate engineering sample and agree tolerance |
| Approved | Verified for the named revision | Button sequence shown in control sheet Rev B | Use for production and inspection |
| Open | A decision still owned by a named person | Retail box language and accessory tray | Assign owner and decision date |
Put the model name, document number, revision, date and approval owners at the top of every page. A “final” filename is not revision control. If the battery, driver, diffuser or control logic changes, update the affected lines and decide whether a new sample or test is necessary.
Section 1: identify the application and working geometry
A work light manufacturer cannot choose a useful beam or mounting system without knowing where the lamp sits. Describe the user, task, working distance, illuminated area, operating duration and the surfaces available for mounting. State whether the unit is carried, hung, clipped, magnetically attached, stood on a base or used in several positions.
A mechanic inside an engine bay may need a broad close-range beam, a magnet that resists sliding and controls that work with oily gloves. A building finisher may need a freestanding flood pattern and stable adjustment angles. A field technician may favour compact size, a clip and charging from a vehicle. Those are specification inputs, not lifestyle copy.
Brightenlux's work, repair and field-service lighting page provides an application-oriented place to begin. The public Working Light category should be checked for current models, while related magnetic-tail and right-angle products can help a buyer discuss mounting geometry when a dedicated work-light SKU is not publicly listed.
Section 2: write optical requirements that describe useful light
Peak lumens alone do not define a work light. The specification should record the intended beam type, working distance, illuminated width, useful modes, colour appearance, glare limits and whether output may step down. If the design has a main beam and a side flood panel, treat them as separate light sources with separate jobs.
For a portable LED work light, a buyer might specify “even illumination across a 1.2-metre engine bay at 0.6 metres” rather than “maximum brightness.” That statement guides diffuser choice and sample evaluation. Add a target for colour consistency if multiple lights will illuminate the same workspace.
Record how output is measured. Is the value an initial reading, a stabilized result, or an LED component rating? Note the battery condition, mode, ambient temperature and measuring method. If the brand will publish runtime, define the end point: complete switch-off, a percentage of initial output, or the time until the light no longer supports the task.
Suggested optical fields
- Main and secondary LED identification or approved performance boundary.
- High, medium, low and special-mode output targets.
- Beam angle, flood width or inspection distance.
- Colour temperature target and acceptable variation.
- Colour rendering requirement where colour judgement matters.
- Glare, visible artifacts and diffuser-uniformity checks.
- Thermal step-down behaviour and sustained-output reference.
Section 3: define battery, charging and runtime as one system
A rechargeable work light supplier should identify the production battery, not merely quote “large capacity.” Write the chemistry, nominal voltage, rated capacity, cell or pack model, protection functions and approved alternatives. If the battery is built in, state the service policy. If it is removable, define the door, polarity marking and replacement identification.
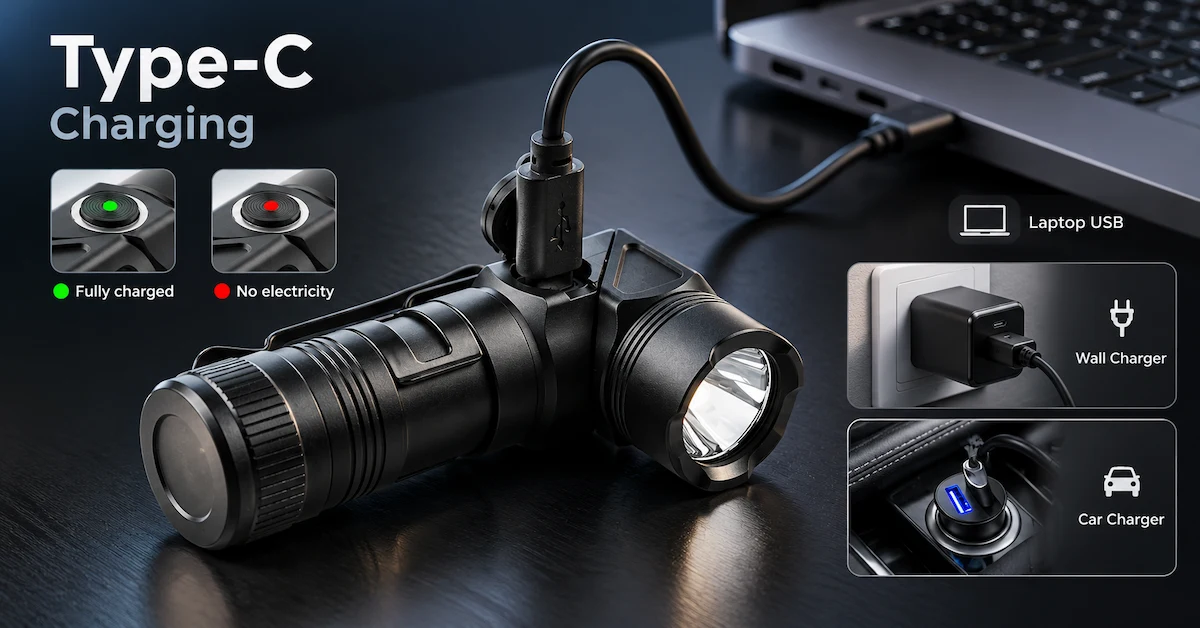
For charging, record the connector, input profile, included cable, charger inclusion, indicator colours, full-charge target and behaviour during charging. Confirm whether the light may operate while connected to power. If it can act as a power bank, define the output separately; do not assume a USB port supports both directions.
Runtime belongs to a particular light mode, battery, temperature and test end point. A 4000mAh pack does not prove eight hours of useful output. Request a curve or timed record for the production-intent configuration. Note whether output is regulated, gradually declines or deliberately steps down. The customer-facing claim should match that behaviour.
The Brightenlux 1500-lumen 21700 magnetic-tail platform illustrates why configuration matters: the product page identifies a 4000mAh battery, Type-C charging, a magnetic tail and multiple modes. These public details can start a work-light conversation, but the buyer still needs an order-specific specification and evidence for the selected build.
Request an OEM Work Light Specification Review
Section 4: document controls and user behaviour
A list of modes is incomplete unless it states how the user reaches them. Write the button sequence, long-press and double-click actions, mode memory, lockout, charging indication and behaviour after power interruption. If a light has independent sources, define whether they can operate together and which control takes priority.
Test the controls with the intended user. A recessed button may resist accidental activation but frustrate a gloved mechanic. A bright indicator may be helpful on a bench and distracting inside a vehicle. If the lamp returns to high mode every time, that may shorten runtime and create glare. These details belong in work light technical specifications because they are repeatable product behaviour.
Use a small control table in the specification. For each action, record input, expected response, indicator and exception. Example: “Single press from off: main flood high; green indicator for three seconds. Long press from any white mode: off. Double press: red warning flash, if included.” The actual sequence should be confirmed for the selected model.
Section 5: set mechanical criteria around repeated handling
Work lights are repositioned, dropped into toolboxes and handled with dirty hands. List the housing materials, lens or diffuser, hinge, hook, magnet, clip, stand, fasteners, port cover and battery door. Add dimensions, weight and centre-of-gravity expectations where stability matters.
A magnet specification should say more than “strong.” Define the test surface, orientation, load condition and whether sliding is acceptable. A hinge criterion should state the required positions, holding torque or cycle expectation. For a hook, identify the load and rotation. For a stand, check tipping at every approved angle with the cable connected.
The Brightenlux compact 90-degree magnetic light and 1000-lumen right-angle platform are relevant reference formats for hands-free inspection. A custom work light manufacturer should explain which mounting elements are standard and which changes affect tooling, validation or MOQ.
Section 6: make environmental claims testable
Words such as rugged, waterproof and workshop-ready are too broad for production acceptance. State the intended dust, splash, temperature, oil, chemical, vibration and impact exposure. Then agree on a test or evidence appropriate to the actual product. An IP rating refers to defined ingress tests; it does not automatically prove drop resistance or resistance to every workshop fluid.
Identify the condition of covers, doors and cables during testing. If the product is only protected with the USB cover closed, the manual and packaging should say so. If a magnet or hinge changes the enclosure, confirm whether the tested sample included that part. The exact configuration matters more than a generic certificate attached to a quotation.
Section 7: connect requirements to an acceptance matrix
A specification becomes operational when each important requirement has an acceptance method. The matrix below shows the structure. Values are examples only; replace them with figures agreed for the selected model.
| Requirement | Target or approved value | Acceptance method | Record |
|---|---|---|---|
| Medium-mode useful runtime | Project-specific hours and end point | Timed test using approved battery and ambient condition | Runtime curve or inspection log |
| Magnetic hold | No fall or unacceptable slide | Named steel surface, orientation and loaded condition | Sample approval sheet |
| Charging indicator | Approved colour and transition | Observe charge cycle and fault condition | Functional test checklist |
| Hinge retention | Holds all approved working angles | Cycle and position check with agreed fixture | Mechanical test report |
| Retail pack contents | Lamp, cable, manual and listed accessories | Count, scan and compare with artwork | Final inspection report |
Do not create false precision. If the team cannot justify a tolerance, leave it as a target and plan the test that will establish the production boundary. A realistic specification is stronger than a table full of numbers copied from unrelated products.
How to set tolerances and sampling without inventing precision
A specification needs boundaries, but a boundary should come from product risk, measurement capability and representative samples. Do not add “plus or minus five percent” to every line because it looks technical. Plastic dimensions, charging time, colour temperature and runtime behave differently and may need different controls.
Start by asking what variation would change the user's experience or the product's fit. A small change in an internal rib may be harmless; the same change at a battery door can damage the seal. A few minutes of runtime may be irrelevant on a long low mode but important when the published claim sits close to the measured result. Assign tighter control where a feature affects safety, compatibility, a public claim or a mechanical interface.
Identify the measurement equipment and resolution. A tolerance smaller than the factory can measure is not a control. For visual criteria, keep approved colour and workmanship samples under defined lighting. For functional criteria, write the fixture, surface, battery state and ambient condition. The buyer and factory should be able to repeat the same check and reach the same conclusion.
The inspection plan should also state how many units are checked and what happens after a failure. Critical functions may warrant broader or complete checks, while dimensions and appearance can use an agreed sampling plan. Classify defects in language appropriate to the product and contract. A lamp that will not charge is not equivalent to a small cosmetic mark on a hidden surface.
Copy-ready RFQ fields for a work light project
The following fields can be pasted into the first inquiry. They do not replace the final specification; they give the factory enough context to propose a platform and identify missing decisions.
- Project identity: brand, working model name, destination market, sales channel and target launch date.
- Application: user, task, working distance, required area, daily operating time and mounting surfaces.
- Lighting: flood or spot preference, output modes, colour target, secondary source and acceptable step-down.
- Power: rechargeable or replaceable format, battery preference, runtime target, charging source and cable or charger inclusion.
- Controls: preferred mode order, memory, lockout, indicators, sensor functions and operation while charging.
- Mechanical: size and weight range, hinge, magnet, hook, clip, stand, handle and service access.
- Environment: expected dust, rain, oil, temperature, vibration, impact and storage conditions.
- Branding: logo process, body colour, rating label, date code, manual language and barcode.
- Packaging: retail or project format, included accessories, display orientation, master-carton limits and pallet needs.
- Commercial: sample quantity, first order, annual forecast, target price basis, delivery term, inspection and warranty.
Ask the supplier to return the list with three additions: its proposed value, the commercial or engineering condition behind that value, and the evidence available. Blank cells are useful. They show where the next conversation belongs and prevent an unstated assumption from appearing later as a disputed requirement.
Section 8: specify OEM branding and packaging as product requirements
A private label work light includes more than a printed logo. Record the logo file and position, colour reference, surface finish, model marking, rating label, country-of-origin statement, serial or date code, manual languages, barcode and retail-box revision. Identify which artwork is applied to the lamp, accessory, inner box and master carton.
Packaging must restrain the light, protect the lens and keep switches from being pressed in transit. Magnets should not damage nearby items or attract loose metal debris during assembly. Cables and chargers need named compartments or ties. If the product is displayed on a shelf, define orientation and visibility. If it ships in a service kit, define the insert and replacement position.
An LED work light manufacturer China sourcing project should also record which compliance and transport documents are expected for the destination and configuration. Requirements differ by product, battery, charger and market. Ask for current evidence tied to the proposed model; do not paste a list of marks onto artwork before the responsible team reviews their applicability.
Section 9: control the BOM, samples and production release
The bill of materials connects the visible specification to purchasing and assembly. Critical entries may include LED, driver, battery, protection board, charging connector, switch, diffuser, magnet, hinge, cable and charger. Record manufacturer, part number or approved performance boundary, plus any pre-approved alternative.
Give each sample a purpose. An appearance sample approves colour and shape. An engineering sample answers questions about function and construction. A production-intent sample represents the proposed production components. A gold sample is a retained comparison reference. One sample cannot prove all four stages unless the team explicitly confirms that it does.
Before release, reconcile the specification revision, BOM, approved sample, control sheet, test results, artwork and inspection plan. If one record still refers to an earlier battery or button sequence, stop and resolve it. The model name alone cannot identify the approved internal build.

A nine-step writing method for the final specification
- Name the project and revision. Put one model identifier, document number, revision and owner on every controlled record.
- Describe the work. State user, task, distance, duration, mounting, environment and sales channel.
- Define useful light. Record beam, modes, colour, glare, output behaviour and the measurement basis.
- Lock the power architecture. Identify battery, protection, charging, indicators, runtime method and service policy.
- Map the controls. Write every press, hold, memory, lockout and low-battery response.
- List mechanical interfaces. Define housing, hinge, magnet, hook, stand, clip, cover and stability criteria.
- Tie claims to evidence. Connect ingress, impact, runtime and charging statements to the exact sample and method.
- Approve brand and pack. Freeze markings, artwork, accessories, instructions and carton arrangement.
- Release against one package. Align specification, BOM, sample, test evidence, inspection plan and change log.
These nine steps turn the specification into a shared working tool. Engineering can see what remains open, purchasing can identify critical parts, quality can build an inspection checklist, and marketing can use claims that describe the approved configuration.
Send Your Work Light Specification Brief
Questions buyers ask while writing the specification
Should the buyer or manufacturer write the first draft?
The buyer should define the user, task, market and non-negotiable requirements. The manufacturer should respond with a buildable proposal, component information, feasible tolerances and test methods. The final document is a joint technical and commercial agreement, not a one-sided wish list.
Can a product page serve as the specification?
No. A product page helps shortlist a platform, but it rarely identifies every internal component, tolerance, operating detail, package revision or production acceptance method. Link the page as a reference, then create a controlled document for the order.
How many lumen and runtime values should be included?
Include the modes customers will actually use and publish. For each one, identify the test configuration and end point. Avoid listing a maximum output without its thermal behaviour or a runtime without its battery and brightness mode.
What happens if the factory proposes an equivalent battery?
Treat the proposal as a change. Compare identity, capacity, protection, dimensions, electrical compatibility, runtime, charging, transport evidence and any affected claims. Approve the alternative in writing before implementation and update the BOM.
How should two supplier quotations be compared?
Normalize the specification first. Check batteries, chargers, cables, accessories, packaging, testing, inspection, tooling, quantity, trade terms and warranty. Two unit prices are not comparable when the delivery scope or product revision differs.
Which records need review before reordering?
Confirm the current specification, retained sample, BOM revision, artwork, battery, LED, driver, packaging and inspection level. Ask whether a component supplier, process or firmware has changed. A repeat order should reproduce an approved product, not restart the selection process invisibly.
Use the specification to obtain a better work light quotation
A precise specification does not eliminate discussion; it makes the discussion useful. It shows the factory which requirements shape the product, reveals conflicts before tooling or artwork is committed, and gives both sides a common basis for sample feedback. It also reduces the temptation to compare suppliers on a single headline number.
For a Brightenlux project, review the current portable lighting range, identify the work task and send the team your draft. Include the destination market, annual quantity, target price, beam and runtime expectations, battery preference, mounting geometry, branding, packaging and timeline. Ask the team to mark every line as required, proposed, approved or open.
The resulting OEM work light specification should follow the product through sample approval, pilot production, inspection and repeat orders. When a change is proposed, update the document before the product changes. That discipline is what turns a promising work light sample into a repeatable private-label program.